Async in-memory SQLite/SQLAlchemy database for FastAPI

Hello friends!

Today I’m presenting the database configuration that I (currently) use on pythondocs.xyz – real time interactive search of Python documentation.

It copies a SQLite database from disk into memory, so it’s very fast. It’s great for read-only workflows – dashboards and the like. It’s not suitable for sites that accept user input, as it makes no attempt to preserve updates to the database.

The config works well for pythondocs.xyz: I generate the site’s database “offline”, with a standalone parser application, and I ship the resulting database file with the web application. When the web app starts up, the database is copied into memory, and you get nice fast database access (even if your queries aren’t super efficient!)

The main dependencies are sqlalchemy, the predominant Python ORM, and aiosqlite, an async replacement for the Standard Library’s sqlite3. I use the database with FastAPI but it should work in other applications.

The database copying is handled by sqlite3‘s backup method. But sqlite3 is a synchronous library, and I want concurrent database access for performance reasons. Luckily, it’s possible to populate the database with sqlite3 and read it from aiosqlite by pointing the two libraries at the same shared memory location.

Without further ado, here’s the code that sets up the database:

from typing import Optional

from sqlalchemy.engine import Engine, create_engine
from sqlalchemy.ext.asyncio import AsyncEngine, AsyncSession, create_async_engine
from sqlalchemy.orm import sessionmaker

SQLITE_SYNC_URL_PREFIX = "sqlite:///"
SQLITE_ASYNC_URL_PREFIX = "sqlite+aiosqlite:///"
MEMORY_LOCATION_START = "file:"
MEMORY_LOCATION_END = "?mode=memory&cache=shared&uri=true"


class InMemoryDatabase:
    """
    Async in-memory SQLite DB
    """

    def __init__(self, sql_echo: bool = False):
        self.sql_echo = sql_echo
        self._sync_memory_engine: Optional[Engine] = None
        self._async_memory_engine: Optional[AsyncEngine] = None
        self._async_sessionmaker: Optional[sessionmaker] = None

    def setup(self, filename: str):
        """
        Copy DB data from disk to memory and setup async session
        """
        sync_disk_engine = create_engine(
            url=SQLITE_SYNC_URL_PREFIX + filename, echo=self.sql_echo
        )
        in_memory_url = MEMORY_LOCATION_START + filename + MEMORY_LOCATION_END
        # Reference to sync in-memory engine remains open
        self._sync_memory_engine = create_engine(
            url=SQLITE_SYNC_URL_PREFIX + in_memory_url, echo=self.sql_echo
        )
        # Use sync engines to copy DB to memory
        backup_db(source_db=sync_disk_engine, target_db=self._sync_memory_engine)
        sync_disk_engine.dispose()
        # Create async engine at same memory location
        self._async_memory_engine = create_async_engine(
            url=SQLITE_ASYNC_URL_PREFIX + in_memory_url, echo=self.sql_echo
        )
        self._async_sessionmaker = sessionmaker(
            self._async_memory_engine, class_=AsyncSession
        )

Compatibility with FastAPI’s dependency injection is provided by this method:

    async def __call__(self) -> AsyncIterator[AsyncSession]:
        """Used by FastAPI Depends"""
        assert self._async_sessionmaker, "No sessionmaker. Run setup() first."
        async with self._async_sessionmaker() as session:
            yield session

(Thank you to the FastAPI Pagination project for inspiration!)

Use with FastAPI looks like this:

from fastapi import Depends, FastAPI
from sqlalchemy import select
from sqlalchemy.ext.asyncio import AsyncSession

from async_in_memory_db import InMemoryDatabase
from example_data import DB_FILENAME, User

app = FastAPI()
db = InMemoryDatabase()


@app.on_event("startup")
async def setup_db():
    db.setup(DB_FILENAME)
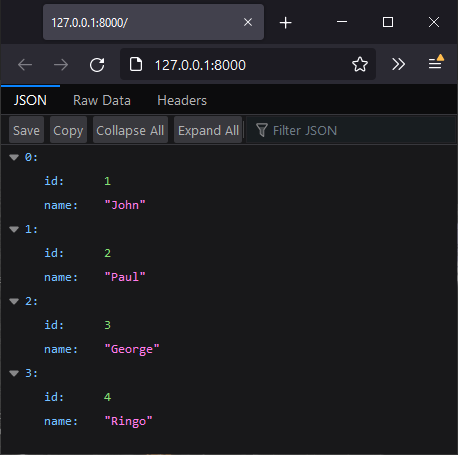

@app.get("/")
async def example_route(session: AsyncSession = Depends(db)) -> list[User]:
    results = await session.execute(select(User))
    return results.scalars().all()

And here’s what you get in your web browser:

JSON response from in-memory DB

Please see the python_async_in_memory_db GitHub repo for the full code, including an example standalone query that doesn’t use FastAPI.

Is this technique useful to you? Can you see any potential pitfalls that I’ve overlooked?

Let me know in the comments below!

Introducing pythondocs.xyz – live search for Python documentation

Winter is long here.

It is so long that I did an accidental software development after False Spring 3 – whoops!

pythondocs.xyz demo

pythondocs.xyz

pythondocs.xyz is a web tool that provides live search results for Python’s official documentation.

Please try it out and let me know what you think!

It’s at “beta” stage, which means it works pretty well but it’s not perfect.

It’s fast and it looks good and the results are… fine.

It did, however, survive the front page of HackerNews without going above 2% CPU usage, which I think is pretty good.

The next big feature will be better search results. In particular: improved prominence of important language features, like built-in functions, and refined full text search and ordering of results.

Here’s the tech stack as it currently stands, for those interested:

  • Parser: Beautiful Soup + Mozilla Bleach
  • Database: in-memory SQLite (aiosqlite) + SQLAlchemy
  • Web server: FastAPI + Uvicorn + Jinja2
  • Front end: Tailwind CSS + htmx + Alpine.js

This is my first big FastAPI project, and over the next few weeks I’ll blog about some of the tricks I used, especially to do with performance.

Backup / migrate Microsoft To Do tasks with PowerShell and Microsoft Graph

Update: this post has a spiritual successor – Extract Microsoft To Do steps/sub-tasks from your web browser (with Asana import example)

For more than a year, I’ve foolishly been using a developer Office 365 subscription for some personal stuff. You know, the subscription where they delete your data if “development activity” isn’t detected every few months. As such, I’ve periodically had to fake some development activity in order to keep the clock ticking.

Not a sustainable situation, and it’s time to sort it out…

For me, this involves moving data from one subscription’s OneDrive to another. I’m fairly confident that Rclone will be able to handle this – it’s an excellent bit of software.

It also means moving Microsoft To Do tasks between subscriptions. Ah.

Not so easy

I couldn’t find an easy way of backing up To Do. There is mention of an Outlook backup option in the docs, but it’s missing on my account. And To Do will happily suck in data from Wunderlist but I can’t see an equivalent to get data out. Where’s the Justice Department when you need them?

Luckily Microsoft Graph has a To Do API in preview and I was able to put together a script to do the lifting for me.

Ironically, this has involved an intense burst of real developer activity…

Enter the Dragon

The full script is over on GitHub.

It provides two functions:

  • Export-MicrosoftTodo saves every Microsoft To Do list and task to an XML file.
  • Import-MicrosoftTodo loads this XML file and restores all lists and tasks.

This is what a backup looks like:

Here’s a restore:

And this is what the client sees:

You can see that the completed status of the tasks has been copied. This is also true of created/modified dates, reminders, notes, and so on.

The script is quite long, so I won’t paste the whole thing here, but here are a few interesting bits:

Emotional support

Thankfully, for the comfort of our technology-addled minds, Microsoft To Do lets you decorate your lists with little emojis. Internally, it looks like if the first character of the name is an emoji, it gets special treatment in the UI.

I was having difficulty creating these special list names but the fix was simply to add charset=utf-8 to Invoke-RestMethod‘s ContentType:

$params = @{
    "Method"         = "Post"
    "Uri"            = ($graphBaseUri + "/me/todo/lists")
    "Authentication" = "OAuth"
    "Token"          = $accessToken
    "Body"           = @{
        "displayName" = $list.displayName
    } | ConvertTo-Json
    # utf-8 makes emojis work. Life priorities are correct.
    "ContentType"    = "application/json; charset=utf-8"
}
Invoke-RestMethod @params

Before and after:

Jason Bateman

The basic aim of the script is to retrieve data from one API endpoint and to later submit the same data to another endpoint.

I found that PowerShell’s – er – adorable magic got in the way a bit. Specifically, the JSON (de-)serialisation done by Convert*-Json / Invoke-RestMethod didn’t preserve empty properties, and the conversion to/from a DateTime object didn’t match the format expected by the API – and I couldn’t see an easy way to override this behaviour.

My solution was to use an alternative JSON parser available in .NET to grab the appropriate bit of the HTTP response, remove a few properties, and store the resulting JSON as a string, to be later POSTed back to the API verbatim:

$response = Invoke-WebRequest -Uri $uri -Authentication OAuth -Token $accessToken
# Invoke-RestMethod / ConvertFrom-Json mangles the response, which I resent,
# so we're using an alternative parser and storing the JSON as a string
# https://stackoverflow.com/a/58169326/12055271
$json = [Newtonsoft.Json.JsonConvert]::DeserializeObject($response.Content)
ForEach ($task in $json.value) {
    # Don't need ID - Graph API can generate a new one
    $task.Remove("id") | Out-Null
    # Don't need ETag
    $task.Remove("@odata.etag") | Out-Null
    $results += $task.ToString()
}

I also chose to save the exported data to disk using PowerShell’s CLI XML format – rather than JSON – as an easy way of guarantee the string stays as it is.

Token effort

The script needs an OAuth2 token in order to authenticate with your Microsoft account.

An easy way to get going (and slightly hacky but fine for personal use) is to grant yourself all Tasks.* permissions in Graph Explorer and copy its token, as demoed here:

(Thanks GoToGuy for this blog post.)

Please read the following license agreement carefully

A few notes on the design of the script:

  • It worked well for me and 5000(!) tasks, but please do your own testing. You can create a test Microsoft account with a secondary email address, or make an Azure tenant for free.
  • Tested with PowerShell 7 only. Get with the times.
  • Export-MicrosoftTodo currently backs up every task and Import-MicrosoftTodo restores every task.
  • If you run Import-MicrosoftTodo twice you’ll end up with duplicates.
  • The account used for export/import is the one that generated the OAuth token. You can backup from one account and restore to another simply by providing different tokens.
  • The script does not currently migrate linkedResources – these “represent[…] an item in a partner application related to a todoTask.” Shrug.
  • Nor does it share any lists as part of data import.
  • Currently, the script needs to be run interactively, in order to receive the OAuth token and to confirm a restore.
  • I’d be open to making improvements in these areas if there’s interest! The script could backup individual lists, for example, or backup someone else’s account (with the appropriate permissions).
  • Unfortunately, I don’t think there’s currently any way to retain list groups.

And in conclusion

Thanks for reading!

This has been a fun project and hopefully you can get some use out of the methods used or the script itself.

Pop up a SimCity-style PowerShell loading screen

In a previous life, I had one script that took a long time to load. Like several minutes. Like, if you’re English, long enough to make a cup of tea.

Rather than fix the underlying inefficiency, the obvious solution was to fill the void with an entertaining loading screen, inspired by a well-known city-building game, whose publisher’s handsome legal team possess a keen sense of proportionality, I’m sure.

A version of that loading screen is what I present today. The code is available on GitHub as a module if you’d like to try it out or follow along.

Here’s what it looks like:

And here’s the code from the example, for easier reading:

Import-Module .\SimCityLoadingScreen

# Create loading screen
$loadingScreen = Show-SimCityLoadingScreen

'Doing something...'
Start-Sleep -Seconds 10
'Done'

# Close loading screen
$loadingScreen.Kill()

As you can see, I import the SimCityLoadingScreen module, and then run Show-SimCityLoadingScreen and save its output in $loadingScreen.

I then do some stuff that takes a while – this could be anything, I’m using Start-Sleep as an example – and, when it’s finished, I close the loading screen with $loadingScreen.Kill()

So, how does it work?

That’s a wrap

If you look at the module code, you can see that that Show-SimCityLoadingScreen is a wrapper for Start-Process.

The function accepts a few parameters for customising the loading screen:

#param (
    [string]$WindowTitle,
    [int]$WindowHeight,
    [int]$WindowWidth,
    [string]$WelcomeMessage
)

Its first line uses the $PSEdition automatic variable to make sure that the new PowerShell process will match the current one:

# Decide whether to spawn pwsh or powershell
$powerShellPath = if ($PSEdition -eq 'Core') {'pwsh'} else {'powershell'}

Then it builds an array of strings that will be given to Start-Process as -ArgumentList. (I use the same technique in PSScriptMenuGui.) You can see that the new process will be told to run a script called loading_screen_script.ps1.

# Construct PowerShell arguments
$loadingScreenPath = Join-Path $PSScriptRoot 'loading_screen_script.ps1'
$psArguments = @()
$psArguments += '-ExecutionPolicy Bypass'
$psArguments += "-File `"$loadingScreenPath`""
# etc.

Finally, it starts the new PowerShell process:

# Launch loading screen script and return process object
# The process object can later be killed to close the window
return Start-Process -FilePath $powerShellPath -PassThru -ArgumentList $psArguments

Because Start-Process is run with -PassThru, it returns an object that represents the new process. In turn, Show-SimCityLoadingScreen returns this object (with the return keyword) to the original script, which is why the loading screen can be closed with $loadingScreen.Kill()

Now that we’ve looked at the wrapper, let’s explore the loading screen script itself. Spoiler: it makes heavy use of Get-Random.

OMG that’s so random

Here’s the meaty part of loading_screen_script.ps1:

$colours = [System.Enum]::GetValues('ConsoleColor')

$messages = Get-Content (Join-Path $PSScriptRoot 'loading_messages.txt') | Sort-Object {Get-Random}

# Loop through messages
foreach ($message in $messages) {
    # Pad message to width of window
    $windowWidth = $host.UI.RawUI.WindowSize.Width
    $message = $message.PadRight($windowWidth)
    # Display message with random foreground and background
    Write-Host $message -ForegroundColor ($colours | Get-Random) -BackgroundColor ($colours | Get-Random)
    # Wait a random amount of time
    Start-Sleep -Milliseconds (Get-Random -Minimum 0 -Maximum 1500)
}

You can see the script stores the 16 built-in console colours as $colours.

Then it grabs 108 wry, copyrighted messages that I found on GitHub somewhere, and:

  • The messages are put in random order with a very PowerShell-y bit of magic: Sort-Object {Get-Random}
  • Each message is padded to the current width of the console, so that the background colour extends across the window, and you get the nice stripey effect.
  • The message is displayed with Write-Host and a random -ForeGroundColor and -BackgroundColor ($colours | Get-Random)

By my calculation, that means there are 27,648‬ possible combinations of message and foreground and background colour, many of which are legible.

Between each message, the script pauses for a random amount of time between zero and 1.5 seconds, which I scientifically determined gives the best illusion that something is happening when in fact it is not.

I demand additional features

There you go: anatomy of a loading screen. Perhaps you learned something along the way about Start-Process and Get-Random?

What can you expect in the next version?

Er, well, probably nothing, because the whole thing is a bit of a toy and not that useful in the real world.

But I have daydreamed that these things would be neat to add:

  • An option to display loading messages in the current console à la Write-Progress.
  • Some logic that will only set a ForeGroundColor and BackgroundColor that display well together.
  • More control over the display of the loading window: perhaps it can be always-on-top, or drawn using WPF.

Get Task Manager list of Apps with PowerShell

Over the past couple of years I’ve been impressed by a series of small improvements to the Task Manager which have made it pretty great to use.

I recently noticed that you if you right click the column titles in the Processes tab and tick all the boxes, you rarely have to venture to the Details tab. (The most valuable column to add, in my opinion, is Command line.)

The Processes tab also attempts to lump items into a few categories: Apps, Background processes, Windows processes.

How does it do this?

Luckily, Raymond Chen briefly explains what’s going on in a blog post from 2017.

To take Apps as an example: If the process has a visible window, then Task Manager calls it an “App”

Can we do something similar with PowerShell?

Probably. Kinda.

Here’s my attempt:

Get-Process | Where-Object {$_.MainWindowTitle} | Select-Object Description

And the result:

You can see that I get processes that have a MainWindowTitle and display the process Description.

The results are similar but not identical: PowerShell shows some bits of Windows internals that are displayed elsewhere in Task Manager.

Can you get any closer?