Async PostgreSQL with FastAPI dependency injection & SQLAlchemy

Hello!

It’s a clear-skied, crisp day here in Minnesota. Winter is coming, but not today.

While we wait for the world to turn and the seasons to change, why not pass some time thinking about database configuration?

I recently moved from SQLite to PostgreSQL as the database for pythondocs.xyz, my project that tries to bring a Google-like experience to Python’s official documentation. (The main motivation was to improve search results with Postgres’ full-text search capabilities.)

Swapping the DB engines proved to be remarkably straightforward: the SQLAlchemy ORM abstracted away dialect differences, and I was already using an abstract Database class with FastAPI, so I just needed to write another implementation.

Keep reading for a walkthrough of the code…

Pre-requisites

You need Postgres running on your machine or in a Docker container.

I’m using Docker Compose for this project. I won’t explain more today but I’m happy to make it the subject of a future blog post if people are interested?

You also need these Python packages:

  • uvicorn (web server), python-dotenv (settings loader), fastapi (web framework), sqlalchemy (ORM) , asyncpg (database driver)

I’m presenting this example as a single Python file so that it’s easy to copy and understand. But I’ll also mention original file paths, as you’ll definitely want more organization in a real project.

Here are the imports for the example:

import os
from abc import ABC, abstractmethod
from typing import AsyncIterator, Optional

import uvicorn
from dotenv import load_dotenv
from fastapi import Depends, FastAPI
from fastapi.responses import JSONResponse
from sqlalchemy import select
from sqlalchemy.ext.asyncio import AsyncSession, create_async_engine
from sqlalchemy.orm import sessionmaker

# not included in example
from app.models import Folder

Config elation

The config module provides production or development settings, depending on environment variable. It also loads the Postgres password from an .env file. The idea is that you add .env to your .gitignore file so that you don’t mix secrets with the rest of your code.

# config.py
load_dotenv()


class Config(ABC):
    POSTGRES_USERNAME = "postgres"
    POSTGRES_DB_NAME = "postgres"
    # localhost for development purposes
    POSTGRES_HOST = "localhost"
    POSTGRES_PORT = "5432"
    # password stored in .env file
    POSTGRES_PASSWORD = os.getenv("POSTGRES_PASSWORD")
    SQL_COMMAND_ECHO = False


class DevelopmentConfig(Config):
    SQL_COMMAND_ECHO = True


class ProductionConfig(Config):
    # hostname in Docker network for production
    POSTGRES_HOST = "db"


def get_config() -> Config:
    env = os.getenv("ENV")
    if env == "development":
        return DevelopmentConfig()
    return ProductionConfig()


config = get_config()

Data based

Here, we define an abstract Database class, with a __call__() method that works with FastAPI’s dependency injection. Its setup() method is provided in concrete implementations, like PostgresDatabase.

# database/base.py
class Database(ABC):
    def __init__(self):
        self.async_sessionmaker: Optional[sessionmaker] = None

    async def __call__(self) -> AsyncIterator[AsyncSession]:
        """For use with FastAPI Depends"""
        if not self.async_sessionmaker:
            raise ValueError("async_sessionmaker not available. Run setup() first.")
        async with self.async_sessionmaker() as session:
            yield session

    @abstractmethod
    def setup(self) -> None:
        ...


# database/postgres.py
def get_connection_string(driver: str = "asyncpg") -> str:
    return f"postgresql+{driver}://{config.POSTGRES_USERNAME}:{config.POSTGRES_PASSWORD}@{config.POSTGRES_HOST}:{config.POSTGRES_PORT}/{config.POSTGRES_DB_NAME}"


class PostgresDatabase(Database):
    def setup(self) -> None:
        async_engine = create_async_engine(
            get_connection_string(),
            echo=config.SQL_COMMAND_ECHO,
        )
        self.async_sessionmaker = sessionmaker(async_engine, class_=AsyncSession)

Stitch it all together

There are a few things going on here:

  1. An instance of PostgresDatabase is created in the depends module.
  2. The fast_api object is created in main.
  3. db.setup() is run as a FastAPI startup event only. This means that all code files can be safely imported without side effects.
  4. A route is definied which performs a simple DB query using FastAPI’s Depends.
  5. Finally, the uvicorn web server is started.
# depends.py
db = PostgresDatabase()

# main.py
fast_api = FastAPI()


@fast_api.on_event("startup")
async def setup_db() -> None:
    db.setup()


# routes.py
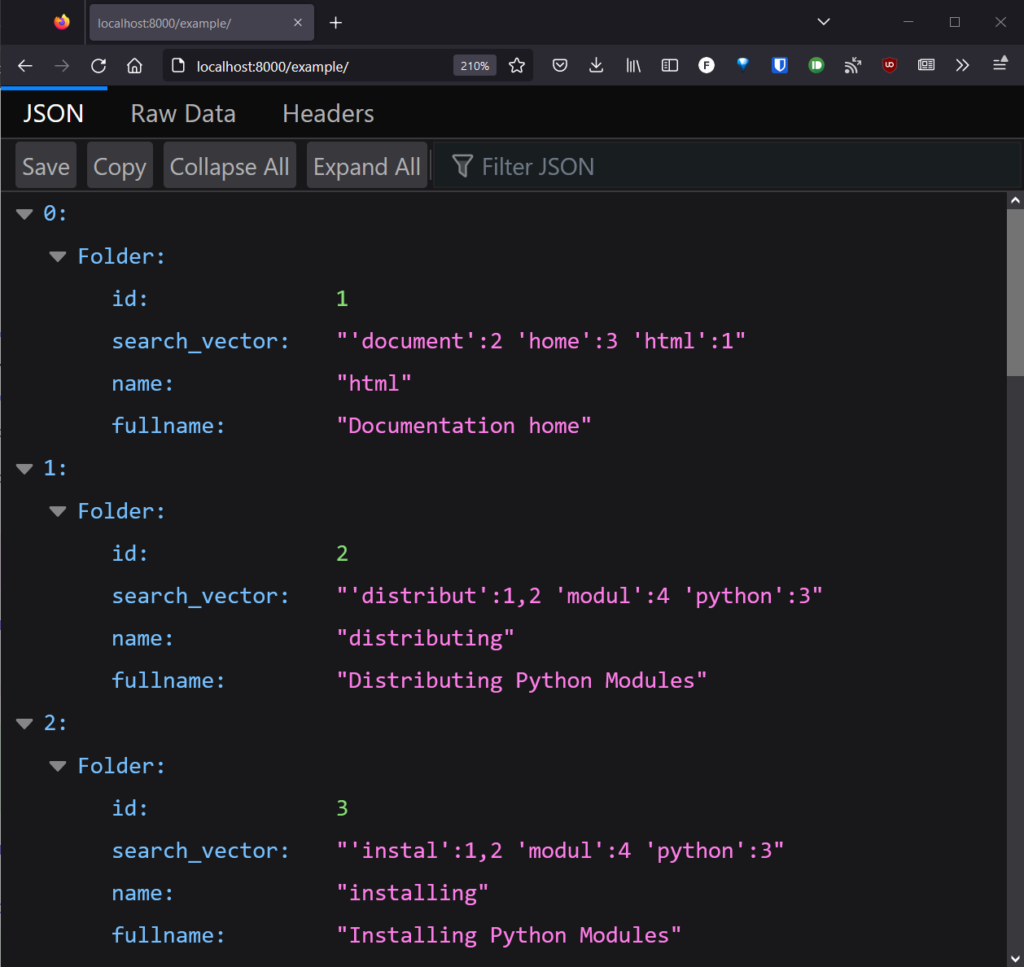
@fast_api.get("/example/")
async def db_query_example(
    session: AsyncSession = Depends(db),
) -> JSONResponse:
    results = await session.execute(select(Folder))
    return results.all()


# run_uvicorn.py
if __name__ == "__main__":
    uvicorn.run(
        "fastapi_postgres_async_example:fast_api",
    )

That’s it!

If the computer Gods smile upon you, you now have a working – and pretty fast – database configuration.

Here’s what my /example/ route looks like. You will need to supply your own data.

Thanks for reading! I hope this has been useful to someone. Please let me know in the comments.

The full code is over here on GitHub.

Extract Microsoft To Do steps/sub-tasks from your web browser (with Asana import example)

Hey. Are you stuck in the year 2020?

Are you trying backup Microsoft To Do tasks with PowerShell and Microsoft Graph?

Have you become infuriated because the Graph API doesn’t let you export sub-tasks?

Well, the good news is that in 2022 – in the future – Microsoft Graph will add support for what they call a checklistItem resource type, which you could very possibly add to the PowerShell solution.

But for the rest of this blog post, let’s pretend that’s not the case, because there is a neat way of extracting all your Microsoft To Do data from your very own web browser.

So stop washing that orange, pick up the nearest fidget spinner, and let’s get crocing…

Index success

When you open To Do in your web browser, you see all of your lists, tasks, sub-tasks, and so on. If you disconnect from the internet, you can still click through everything. So “the stuff” must be somewhere on your device. But what is the stuff and where does it live?

Microsoft To Do is a single-page application and it stores its data in IndexedDB, a client-side data store built into modern web browsers. Here’s what my To Do database looks like in Chrome’s developer tools:

And here’s an example from my lists, the somewhat-useful “List o list”:

You see that the list has a unique identifier – id. As you might hope, a task has a field called list_id, which links it to its parent. A task has an id of its own, which is referenced by a step (sub-task) as – you guessed it – task_id. It’s IDs all the way and the data we need is clearly there. But how do we get it?

Requesting extraction

Thankfully, Florian Reuschel has written a fantastic code snippet that lets you dump an IndexedDB database to JSON in your dev tools console. I’ve put some step-by-step instructions on GitHub here.

The JSON file on its own serves as a form of backup – all of your data is present, even if it’s not in an immediately useful format.

I’ve also put a Python script on GitHub that converts the JSON file to Asana’s CSV Importer format.

It was a “write once, run once” kind of thing, made for someone who got in touch via my blog (hi Charlie!). It’s not a masterpiece of modular software design and it has to deal with some quirks in Asana’s API. But I think it’s fairly easy to reason with and hopefully can serve as inspiration if you need to do something similar.

Does it even work?

Yes!

From this:

The OG “List o list”

Via this:

Dumping IndexedDB from browser dev console
JSON to Asana CSV conversion in Python

To this:

“List o list” in Asana land, with sub-tasks included

The process relies on undocumented behaviour, so a solution using the updated Graph API would strictly be more correct (but less fun).

However, at the time of writing, the whole thing works suprisingly well, so if you do want to migrate from Microsoft To Do from Asana it might be worth trying. As ever, make sure you test with some dummy data/test accounts before you commit to anything permanent.

The code and instructions are over here on GitHub.

A very simple async Response cache for FastAPI

Hello world! How’s it going out there? Monkey pox scars healing OK? Great.

My most recent project is pythondocs.xyz – real time interactive search of Python documentation.

If you haven’t checked it out yet, please take a look and let me know what you think over here.

The site is built with FastAPI and I wanted to make it as fast as possible. In particular, I wanted the home page to load almost instantly. The home page is constructed from a couple of database queries and I realised I could reduce load times by building the page once then caching it for future visitors.

But how?

Decorated service

Here’s the solution I came up with, with no external dependencies.

To start, some imports:

import asyncio
from functools import wraps

from fastapi import FastAPI, Request
from fastapi.responses import HTMLResponse
from fastapi.templating import Jinja2Templates

The main course is where you find the meat:

def cache_response(func):
    """
    Decorator that caches the response of a FastAPI async function.

    Example:
    ```
        app = FastAPI()

        @app.get("/")
        @cache_response
        async def example():
            return {"message": "Hello World"}
    ```
    """
    response = None

    @wraps(func)
    async def wrapper(*args, **kwargs):
        nonlocal response
        if not response:
            response = await func(*args, **kwargs)
        return response

    return wrapper

And what’s for dessert? Oh, my favorite: objects! They’ll come in handy for the examples below…

app = FastAPI()
templates = Jinja2Templates(directory="templates")

What’s going on?

The idea is that you insert the @cache_response decorator between your async function and its FastAPI path operation decorator.

Here’s a simple example:

@app.get("/json/")
@cache_response
async def json_example():
    await asyncio.sleep(2)
    return {"message": "Hello World"}

When someone navigates to /json/, the json_example function is passed into the wrapper as func.

On the first visit, the wrapper awaits func, stores its response for next time, and returns the response.

On subsequent visits, the response is returned directly, func is never called, and whatever expensive operations it contains don’t slow things down.

Template tantrum

The decorator also works with functions that have parameters, like this Jinja template route:

@app.get("/", response_class=HTMLResponse)
@cache_response
async def home_page(request: Request):
    await asyncio.sleep(2)
    return templates.TemplateResponse("hello_world.html", context={"request": request})

But beware that the first response is always stored and reused, even if called with different arguments!

Is this a terrible idea?

I don’t think it’s, like, the worst idea ever. It’s not like writing your Social Security Number on your front door.

But this is computers and there’s a million ways of doing everything, with various strengths and weaknesses.

I think these are the main downsides of this very simple approach:

  • The cached data is stored in-process and so won’t be shared with other workers.
  • There’s no way of clearing the cache (other than restarting Python).
  • A response isn’t cached until the first call completes. Additional requests received before this happens will still trigger your expensive function.

Here are some alternative approaches, which may work better for your case:

  • Cache intermediate steps in your function (rather than the whole thing), perhaps with functools.cache.
  • Use a dedicated caching service, like Redis, or a database.
  • Cache static assets with a Content Delivery Network, like Cloudflare.

Thanks for reading

More Python stuff coming soon.

Let me know if you have any comments on this post or ideas for the future!

The full code for this post is here on GitHub.

Tutorial: Use a CSV file to make a graphical menu of PowerShell scripts

I’ve recently been working on a PowerShell module that uses a CSV file to create a custom menu of scripts.

It looks like this:

It hopefully helps to bridge the gap between engineers and automators, who write scripts useful to others, and service desk people and technicians, who may not be confident with the command line. PSScriptMenuGui allows PowerShell coders to put their scripts in a simple menu, usable by anyone.

It’s loosely inspired by (criminally similar to) something I made for a previous employer.

(The main difference is that this version starts instantly. The old version was so slow that I made an entertaining loading screen to fill the void. A good subject for a future blog post…)

If you’d like to dive straight in, please:

The rest of this blog post acts as a tutorial.

If you’d like to be guided through making your own menu, keep reading…

Step 0: System requirements

The module works on Windows only – sorry, rest of world!

Apart from that, it should run pretty much anywhere. It works on:

  • PowerShell for Windows 5.1 which comes with Windows 10.
  • PowerShell 7, currently available as a preview and due to be finished at the start of 2020.

It does not work on PowerShell Core 6. If you have this version, the easiest solution is to use PowerShell 5.1 as it is already on your PC.

Step 1: Install the module and make an example menu

Open a PowerShell prompt and:

# Navigate to where you want to work on your menu - in my case OneDrive:
cd $env:OneDrive
# Install the module:
Install-Module PSScriptMenuGui -Scope CurrentUser
# You may need read and agree to messages about updates and trust
# Make an example menu to get you going:
New-ScriptMenuGuiExample

You should see this:

VERBOSE: Copying example files to PSScriptMenuGui_example...

Step 2: Explore the example

Navigate to your PSScriptMenuGui_example folder and open PSScriptMenuGui.ps1. You should see a bit of boilerplate to ensure that the module is loaded, followed by this line which displays the menu:

Show-ScriptMenuGui -csvPath '.\example_data.csv' -Verbose

Try running the line in your PowerShell window. You should see the example menu from the GIF at the top of this post.

Now open example_data.csv. A text editor is fine but Excel is easier. You can see that every row in the CSV represents an item in the menu.

Step 3: Make it your own

Experiment with editing the CSV and running the Show-ScriptMenuGui command again to see your changes.

A few ideas:

  • Put one of your scripts in the folder and add it to the menu using Method powershell_file and Command .\filename_of_script.ps1.
  • Try including PowerShell commands in the CSV file. Use Method powershell_inline and Command Get-ComputerInfo. Run Show-ScriptMenuGui with -NoExit to stop the PowerShell window from closing.
  • Add a link to an external application. Use Method cmd and enter the path of the program in Command.

Step 4: Next steps

Step 5: Make a shortcut

When you’re happy with your menu, why not make a shortcut to it in File Explorer?

  1. Right click a blank area in a folder window or on your desktop.
  2. Select New → Shortcut
  3. Enter something like this as the location:
C:\Windows\System32\WindowsPowerShell\v1.0\powershell.exe -ExecutionPolicy Bypass -WindowStyle Hidden -File "C:\full\path\PSScriptMenuGui_example\PSScriptMenuGui.ps1"

How to make your free Azure Linux VM actually free

Azure gives you a good amount of stuff free for 12 months when you sign up.

Quite tantalizing among these is a free Linux VM:

But if you make a B1S VM with the Ubuntu Server 18.04 LTS image, you start getting charged a trickle of cash for the disk. I amassed a bill of $1.26 before I noticed – quite shocking!

What’s up?

It turns out the 6 in P6 represents the size of the disk: 64 GB.

And the Ubuntu disk is only 30 GB. So you’re being charged for using too small a disk!

Luckily the fix is simple.

Start by creating your VM as normal:

Once it’s been provisioned, Stop (Deallocate) the VM:

Then open your VM in the Azure portal and navigate to Disks -> click disk name -> Configuration.

Set Size (GiB) to 64 and click Save.

Then start your VM back up. It should now be free of charge – and you’ll have a bit more space to play with.