Inlay Type Hints: a cool new feature for Python & VS Code

Yesterday, I was playing around with my VS Code settings, which is something normal that I do for fun.

I came across settings for Inlay Type Hints, which is a new feature to me, but apparently has been available since July.

Here’s a quick demo:

Demo of Inlay Type Hints for Python in VS Code

You can see that Pylance (VS Code’s Python language server) now displays inferred types for function returns and variables that have not been explicitly type annotated.

The user experience is good but I have a few ideas for improvements:

  • It would be great if type inlays had color/mouse-over information before being inserted,
  • and if types were also automatically imported when inserted.

For now, I have function return annotation enabled all the time, and turn variable annotation on and off depending on what I’m doing – it can be a bit spammy in dense code, but it’s invaluable for debugging. (It would also be nice to be able to toggle annotations with a click!)

Overall, I think this a really cool feature. It underlines the big improvements in Python tooling – by VS Code in particular – that have been made possible by the gradual introduction of type annotation support to the language.
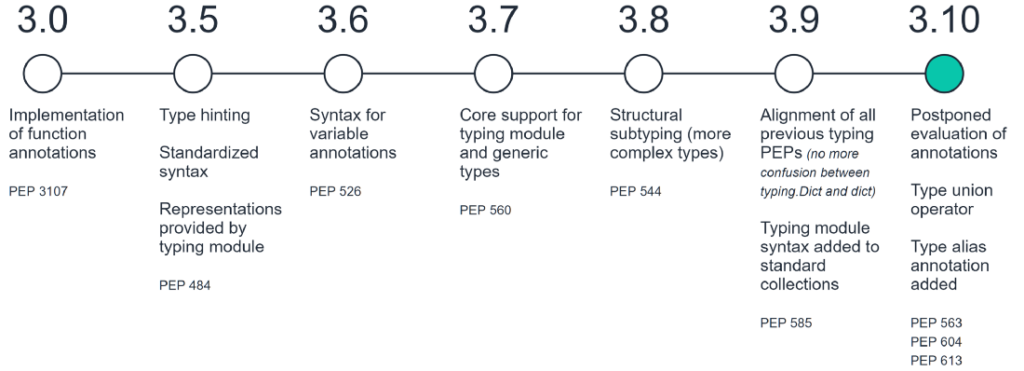
Timeline of changes to type annotations from Python 3.0 to 3.10.
Source: Towards Data Science

Python & VS Code: make Black and organize imports work together on save

Hello world. What a stable and positive time to be alive!

But at least we can fix our code editors.

I use Black to format my Python code, and I tell VS Code to organise imports on save.

Here’s the relevant bit of VS Code’s settings.json:

{
    "python.formatting.provider": "black",
    "editor.formatOnSave": true,
    "editor.codeActionsOnSave": {
        "source.organizeImports": true
    }
}

It’s a pretty pleasant experience, mostly. But this “flapping” behaviour when I save has been bugging me for weeks:

(It’s even more annoying when you’re part way down a file and the entire screen jerks up and down.)

Clearly, Black and the organize imports thing are fighting. But what is the organize imports thing? And what’s the fix?

It turns out that VS Code uses the isort library to sort imports, and isort has a Black compatability profile.

As a Poetry user, all I had to do is add these lines to the pyproject.toml file at the root of my project:

[tool.isort]
profile = "black"

Alternatively, create a file called .isort.cfg (note the leading dot) at the root of your project, with this content:

[settings]
profile=black

No more flapping, and at least one small corner of the universe is a little more sane.

Start Windows Terminal in WSL2 home directory

A little tip, partly written for the benefit of future-me…

As you may know, WSL2 filesystem performance is much improved over its predecessor – but only in the virtual disk of your Linux distro. The mounted Windows disk – /mnt/c/ – is still slow for disk-heavy operations, like Git clones, because of Linux-plus-NTFS something reasons.

Because of this, the first thing I do when I open my WSL2 Ubuntu distro in Windows Terminal is change to my Linux home directory. Every time.

There must be an easier way? Yep.

From the WSL docs:

bash ~ launches the bash shell into the user’s home directory. Similar to running cd ~.

To make this the default in Windows Terminal, open the Windows Terminal Settings, find your WSL2 profile, and add “commandline”: “bash.exe ~”

{
    "guid": "{2c4de342-38b7-51cf-b940-2309a097f518}",
    "hidden": false,
    "name": "Ubuntu",
    "source": "Windows.Terminal.Wsl",
    "commandline": "bash.exe ~"
}

(Note that the “source” line now needs a trailing comma.)

From this:

To this:

View all Windows Terminal colour schemes

Want to set the snazziest Windows Terminal colour scheme but not sure how to go about it?

Surely this is the top of everyone’s to-do list at this time of unprecedented calmness and serenity…

You could spend 5 minutes manually trying out the various options.

You could spend an hour hacking together a fairly rickety script that launches Windows Terminal with each of the built-in schemes.

Or you could let me do that for you and spend 20 seconds watching the results in video form:

Why not reward yourself for your time efficiency by spending 4 minutes 40 seconds scouring the Internet for Coronavirus morsels? Some suggested search terms:

  • potato long term storage tips
  • discourage social interaction clothing ideas obscene
  • maximum safe potato consumption
  • handshake alternatives obscene
  • where buy potato minneapolis

Stay safe out there.

Here’s the code:

# Script that cycles through all Windows Terminal color schemes
# Depends on there being a profile called "PowerShell" with a colorScheme already set
param(
    $profilesJsonPath = (Join-Path $env:LOCALAPPDATA 'Packages\Microsoft.WindowsTerminal_8wekyb3d8bbwe\LocalState\profiles.json'),
    $defaultsJsonPath = (Join-Path $env:ProgramFiles 'WindowsApps\Microsoft.WindowsTerminal_0.10.761.0_x64__8wekyb3d8bbwe\defaults.json')
)

# Get all color schemes from default profiles file
$defaults = Get-Content $defaultsJsonPath | ConvertFrom-Json
$colorSchemes = $defaults.schemes.name

# Get profiles as text
$profiles = Get-Content $profilesJsonPath

# Fragile string stuff to find index of the colorScheme line in the PowerShell profile
# Easier than dealing with JSON + comments as objects?
$psNameIndex = ($profiles | Select-String '"name": "PowerShell",').LineNumber - 1
$sectionBoundaries = ($profiles | Select-String '},').LineNumber | ForEach-Object {$_ - 1} # Section delimited by '},'
$sectionStart = ($sectionBoundaries | Where-Object {$_ -lt $psNameIndex})[-1]
$sectionEnd = ($sectionBoundaries | Where-Object {$_ -gt $psNameIndex})[0]
$colorIndex = ($profiles[$sectionStart..$sectionEnd] | Select-String '"colorScheme":').LineNumber - 1 + $sectionStart

ForEach ($newScheme in $colorSchemes) {
    # Regex to insert new scheme
    $profiles[$colorIndex] = $profiles[$colorIndex] -replace '"colorScheme":.*[^,]' ,"`"colorScheme`": `"$newScheme`""
    # Write out JSON
    $profiles | Out-File $profilesJsonPath
    # Launch Windows Terminal
    $command = "Read-Host `"$newScheme`""
    $arguments = @{
        'FilePath' = 'wt.exe'
        'ArgumentList' = "-p `"PowerShell`" pwsh.exe -Command $command"
        'Wait' = $true
        'WindowStyle' = 'Maximized'
    }
    Start-Process @arguments
}

Add PowerShell 7-preview to Microsoft Windows Terminal (0.6+)

Update: the Windows Terminal now automatically detects PowerShell Core and this blog post is defunct.

The new Windows Terminal continues to be developed and it has a dwindling list of deal-breakers (why won’t my mousewheel scroll??)

Along the way, the format of the settings file has changed, and my previous method for adding a profile for PowerShell 7 no longer works.

Below is a new block of code that’ll do the job. As before, just copy-n-paste into a PowerShell window and you’re good to go.

PowerShell 7-preview x64 needs to be installed and you need to have run Windows Terminal at least once.

I’m now doing horrible things with strings – because it’s easier than dealing with a comments and a JSON object – so this code is officially 3x more likely to blow up.

# Get Windows Terminal settings
$terminalFolderPath = "$env:LOCALAPPDATA\Packages\Microsoft.WindowsTerminal_8wekyb3d8bbwe\LocalState"
$settingsFilePath = Join-Path $terminalFolderPath 'profiles.json'
[System.Collections.ArrayList]$settings = Get-Content $settingsFilePath
# Download icon
$pwsh7IconPath = Join-Path $terminalFolderPath 'pwsh7.ico'
Invoke-WebRequest -Uri 'https://raw.githubusercontent.com/weebsnore/Add-PS7ToWindowsTerminal/master/pwsh7.ico' -OutFile $pwsh7IconPath
# Generate PS7 profile JSON
$ps7profile = @{
    'guid' = '{' + (New-Guid).ToString() + '}'
    'name' = 'PowerShell 7-preview (x64)'
    'commandline' = 'C:\Program Files\PowerShell\7-preview\pwsh.exe'
    'icon' = $pwsh7IconPath
} | ConvertTo-Json
# Append comma to profile JSON
$ps7profile = $ps7profile + ','
# Find "profiles" line number
$profilesLine = ($settings | Select-String '"profiles":').LineNumber
# Add new profile to JSON and write to disk
,$settings.Insert($profilesLine+1,$ps7profile)
$settings | Out-File $settingsFilePath

Code here on GitHub.