Backup / migrate Microsoft To Do tasks with PowerShell and Microsoft Graph

Update: this post has a spiritual successor – Extract Microsoft To Do steps/sub-tasks from your web browser (with Asana import example)

For more than a year, I’ve foolishly been using a developer Office 365 subscription for some personal stuff. You know, the subscription where they delete your data if “development activity” isn’t detected every few months. As such, I’ve periodically had to fake some development activity in order to keep the clock ticking.

Not a sustainable situation, and it’s time to sort it out…

For me, this involves moving data from one subscription’s OneDrive to another. I’m fairly confident that Rclone will be able to handle this – it’s an excellent bit of software.

It also means moving Microsoft To Do tasks between subscriptions. Ah.

Not so easy

I couldn’t find an easy way of backing up To Do. There is mention of an Outlook backup option in the docs, but it’s missing on my account. And To Do will happily suck in data from Wunderlist but I can’t see an equivalent to get data out. Where’s the Justice Department when you need them?

Luckily Microsoft Graph has a To Do API in preview and I was able to put together a script to do the lifting for me.

Ironically, this has involved an intense burst of real developer activity…

Enter the Dragon

The full script is over on GitHub.

It provides two functions:

  • Export-MicrosoftTodo saves every Microsoft To Do list and task to an XML file.
  • Import-MicrosoftTodo loads this XML file and restores all lists and tasks.

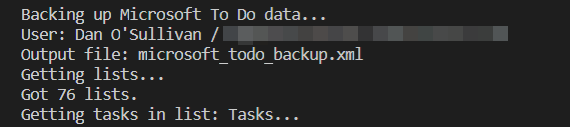
This is what a backup looks like:
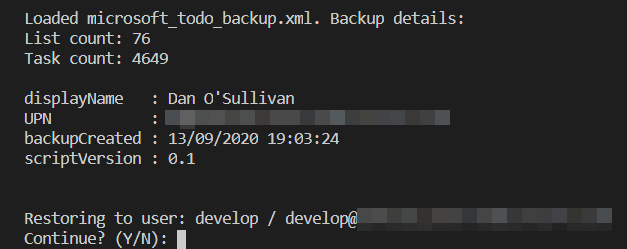
Here’s a restore:

And this is what the client sees:

You can see that the completed status of the tasks has been copied. This is also true of created/modified dates, reminders, notes, and so on.

The script is quite long, so I won’t paste the whole thing here, but here are a few interesting bits:

Emotional support

Thankfully, for the comfort of our technology-addled minds, Microsoft To Do lets you decorate your lists with little emojis. Internally, it looks like if the first character of the name is an emoji, it gets special treatment in the UI.

I was having difficulty creating these special list names but the fix was simply to add charset=utf-8 to Invoke-RestMethod‘s ContentType:

$params = @{
    "Method"         = "Post"
    "Uri"            = ($graphBaseUri + "/me/todo/lists")
    "Authentication" = "OAuth"
    "Token"          = $accessToken
    "Body"           = @{
        "displayName" = $list.displayName
    } | ConvertTo-Json
    # utf-8 makes emojis work. Life priorities are correct.
    "ContentType"    = "application/json; charset=utf-8"
}
Invoke-RestMethod @params

Before and after:

Jason Bateman

The basic aim of the script is to retrieve data from one API endpoint and to later submit the same data to another endpoint.

I found that PowerShell’s – er – adorable magic got in the way a bit. Specifically, the JSON (de-)serialisation done by Convert*-Json / Invoke-RestMethod didn’t preserve empty properties, and the conversion to/from a DateTime object didn’t match the format expected by the API – and I couldn’t see an easy way to override this behaviour.

My solution was to use an alternative JSON parser available in .NET to grab the appropriate bit of the HTTP response, remove a few properties, and store the resulting JSON as a string, to be later POSTed back to the API verbatim:

$response = Invoke-WebRequest -Uri $uri -Authentication OAuth -Token $accessToken
# Invoke-RestMethod / ConvertFrom-Json mangles the response, which I resent,
# so we're using an alternative parser and storing the JSON as a string
# https://stackoverflow.com/a/58169326/12055271
$json = [Newtonsoft.Json.JsonConvert]::DeserializeObject($response.Content)
ForEach ($task in $json.value) {
    # Don't need ID - Graph API can generate a new one
    $task.Remove("id") | Out-Null
    # Don't need ETag
    $task.Remove("@odata.etag") | Out-Null
    $results += $task.ToString()
}

I also chose to save the exported data to disk using PowerShell’s CLI XML format – rather than JSON – as an easy way of guarantee the string stays as it is.

Token effort

The script needs an OAuth2 token in order to authenticate with your Microsoft account.

An easy way to get going (and slightly hacky but fine for personal use) is to grant yourself all Tasks.* permissions in Graph Explorer and copy its token, as demoed here:

(Thanks GoToGuy for this blog post.)

Please read the following license agreement carefully

A few notes on the design of the script:

  • It worked well for me and 5000(!) tasks, but please do your own testing. You can create a test Microsoft account with a secondary email address, or make an Azure tenant for free.
  • Tested with PowerShell 7 only. Get with the times.
  • Export-MicrosoftTodo currently backs up every task and Import-MicrosoftTodo restores every task.
  • If you run Import-MicrosoftTodo twice you’ll end up with duplicates.
  • The account used for export/import is the one that generated the OAuth token. You can backup from one account and restore to another simply by providing different tokens.
  • The script does not currently migrate linkedResources – these “represent[…] an item in a partner application related to a todoTask.” Shrug.
  • Nor does it share any lists as part of data import.
  • Currently, the script needs to be run interactively, in order to receive the OAuth token and to confirm a restore.
  • I’d be open to making improvements in these areas if there’s interest! The script could backup individual lists, for example, or backup someone else’s account (with the appropriate permissions).
  • Unfortunately, I don’t think there’s currently any way to retain list groups.

And in conclusion

Thanks for reading!

This has been a fun project and hopefully you can get some use out of the methods used or the script itself.

View all Windows Terminal colour schemes

Want to set the snazziest Windows Terminal colour scheme but not sure how to go about it?

Surely this is the top of everyone’s to-do list at this time of unprecedented calmness and serenity…

You could spend 5 minutes manually trying out the various options.

You could spend an hour hacking together a fairly rickety script that launches Windows Terminal with each of the built-in schemes.

Or you could let me do that for you and spend 20 seconds watching the results in video form:

Why not reward yourself for your time efficiency by spending 4 minutes 40 seconds scouring the Internet for Coronavirus morsels? Some suggested search terms:

  • potato long term storage tips
  • discourage social interaction clothing ideas obscene
  • maximum safe potato consumption
  • handshake alternatives obscene
  • where buy potato minneapolis

Stay safe out there.

Here’s the code:

# Script that cycles through all Windows Terminal color schemes
# Depends on there being a profile called "PowerShell" with a colorScheme already set
param(
    $profilesJsonPath = (Join-Path $env:LOCALAPPDATA 'Packages\Microsoft.WindowsTerminal_8wekyb3d8bbwe\LocalState\profiles.json'),
    $defaultsJsonPath = (Join-Path $env:ProgramFiles 'WindowsApps\Microsoft.WindowsTerminal_0.10.761.0_x64__8wekyb3d8bbwe\defaults.json')
)

# Get all color schemes from default profiles file
$defaults = Get-Content $defaultsJsonPath | ConvertFrom-Json
$colorSchemes = $defaults.schemes.name

# Get profiles as text
$profiles = Get-Content $profilesJsonPath

# Fragile string stuff to find index of the colorScheme line in the PowerShell profile
# Easier than dealing with JSON + comments as objects?
$psNameIndex = ($profiles | Select-String '"name": "PowerShell",').LineNumber - 1
$sectionBoundaries = ($profiles | Select-String '},').LineNumber | ForEach-Object {$_ - 1} # Section delimited by '},'
$sectionStart = ($sectionBoundaries | Where-Object {$_ -lt $psNameIndex})[-1]
$sectionEnd = ($sectionBoundaries | Where-Object {$_ -gt $psNameIndex})[0]
$colorIndex = ($profiles[$sectionStart..$sectionEnd] | Select-String '"colorScheme":').LineNumber - 1 + $sectionStart

ForEach ($newScheme in $colorSchemes) {
    # Regex to insert new scheme
    $profiles[$colorIndex] = $profiles[$colorIndex] -replace '"colorScheme":.*[^,]' ,"`"colorScheme`": `"$newScheme`""
    # Write out JSON
    $profiles | Out-File $profilesJsonPath
    # Launch Windows Terminal
    $command = "Read-Host `"$newScheme`""
    $arguments = @{
        'FilePath' = 'wt.exe'
        'ArgumentList' = "-p `"PowerShell`" pwsh.exe -Command $command"
        'Wait' = $true
        'WindowStyle' = 'Maximized'
    }
    Start-Process @arguments
}

Pop up a SimCity-style PowerShell loading screen

In a previous life, I had one script that took a long time to load. Like several minutes. Like, if you’re English, long enough to make a cup of tea.

Rather than fix the underlying inefficiency, the obvious solution was to fill the void with an entertaining loading screen, inspired by a well-known city-building game, whose publisher’s handsome legal team possess a keen sense of proportionality, I’m sure.

A version of that loading screen is what I present today. The code is available on GitHub as a module if you’d like to try it out or follow along.

Here’s what it looks like:

And here’s the code from the example, for easier reading:

Import-Module .\SimCityLoadingScreen

# Create loading screen
$loadingScreen = Show-SimCityLoadingScreen

'Doing something...'
Start-Sleep -Seconds 10
'Done'

# Close loading screen
$loadingScreen.Kill()

As you can see, I import the SimCityLoadingScreen module, and then run Show-SimCityLoadingScreen and save its output in $loadingScreen.

I then do some stuff that takes a while – this could be anything, I’m using Start-Sleep as an example – and, when it’s finished, I close the loading screen with $loadingScreen.Kill()

So, how does it work?

That’s a wrap

If you look at the module code, you can see that that Show-SimCityLoadingScreen is a wrapper for Start-Process.

The function accepts a few parameters for customising the loading screen:

#param (
    [string]$WindowTitle,
    [int]$WindowHeight,
    [int]$WindowWidth,
    [string]$WelcomeMessage
)

Its first line uses the $PSEdition automatic variable to make sure that the new PowerShell process will match the current one:

# Decide whether to spawn pwsh or powershell
$powerShellPath = if ($PSEdition -eq 'Core') {'pwsh'} else {'powershell'}

Then it builds an array of strings that will be given to Start-Process as -ArgumentList. (I use the same technique in PSScriptMenuGui.) You can see that the new process will be told to run a script called loading_screen_script.ps1.

# Construct PowerShell arguments
$loadingScreenPath = Join-Path $PSScriptRoot 'loading_screen_script.ps1'
$psArguments = @()
$psArguments += '-ExecutionPolicy Bypass'
$psArguments += "-File `"$loadingScreenPath`""
# etc.

Finally, it starts the new PowerShell process:

# Launch loading screen script and return process object
# The process object can later be killed to close the window
return Start-Process -FilePath $powerShellPath -PassThru -ArgumentList $psArguments

Because Start-Process is run with -PassThru, it returns an object that represents the new process. In turn, Show-SimCityLoadingScreen returns this object (with the return keyword) to the original script, which is why the loading screen can be closed with $loadingScreen.Kill()

Now that we’ve looked at the wrapper, let’s explore the loading screen script itself. Spoiler: it makes heavy use of Get-Random.

OMG that’s so random

Here’s the meaty part of loading_screen_script.ps1:

$colours = [System.Enum]::GetValues('ConsoleColor')

$messages = Get-Content (Join-Path $PSScriptRoot 'loading_messages.txt') | Sort-Object {Get-Random}

# Loop through messages
foreach ($message in $messages) {
    # Pad message to width of window
    $windowWidth = $host.UI.RawUI.WindowSize.Width
    $message = $message.PadRight($windowWidth)
    # Display message with random foreground and background
    Write-Host $message -ForegroundColor ($colours | Get-Random) -BackgroundColor ($colours | Get-Random)
    # Wait a random amount of time
    Start-Sleep -Milliseconds (Get-Random -Minimum 0 -Maximum 1500)
}

You can see the script stores the 16 built-in console colours as $colours.

Then it grabs 108 wry, copyrighted messages that I found on GitHub somewhere, and:

  • The messages are put in random order with a very PowerShell-y bit of magic: Sort-Object {Get-Random}
  • Each message is padded to the current width of the console, so that the background colour extends across the window, and you get the nice stripey effect.
  • The message is displayed with Write-Host and a random -ForeGroundColor and -BackgroundColor ($colours | Get-Random)

By my calculation, that means there are 27,648‬ possible combinations of message and foreground and background colour, many of which are legible.

Between each message, the script pauses for a random amount of time between zero and 1.5 seconds, which I scientifically determined gives the best illusion that something is happening when in fact it is not.

I demand additional features

There you go: anatomy of a loading screen. Perhaps you learned something along the way about Start-Process and Get-Random?

What can you expect in the next version?

Er, well, probably nothing, because the whole thing is a bit of a toy and not that useful in the real world.

But I have daydreamed that these things would be neat to add:

  • An option to display loading messages in the current console à la Write-Progress.
  • Some logic that will only set a ForeGroundColor and BackgroundColor that display well together.
  • More control over the display of the loading window: perhaps it can be always-on-top, or drawn using WPF.

Add PowerShell 7-preview to Microsoft Windows Terminal (0.6+)

Update: the Windows Terminal now automatically detects PowerShell Core and this blog post is defunct.

The new Windows Terminal continues to be developed and it has a dwindling list of deal-breakers (why won’t my mousewheel scroll??)

Along the way, the format of the settings file has changed, and my previous method for adding a profile for PowerShell 7 no longer works.

Below is a new block of code that’ll do the job. As before, just copy-n-paste into a PowerShell window and you’re good to go.

PowerShell 7-preview x64 needs to be installed and you need to have run Windows Terminal at least once.

I’m now doing horrible things with strings – because it’s easier than dealing with a comments and a JSON object – so this code is officially 3x more likely to blow up.

# Get Windows Terminal settings
$terminalFolderPath = "$env:LOCALAPPDATA\Packages\Microsoft.WindowsTerminal_8wekyb3d8bbwe\LocalState"
$settingsFilePath = Join-Path $terminalFolderPath 'profiles.json'
[System.Collections.ArrayList]$settings = Get-Content $settingsFilePath
# Download icon
$pwsh7IconPath = Join-Path $terminalFolderPath 'pwsh7.ico'
Invoke-WebRequest -Uri 'https://raw.githubusercontent.com/weebsnore/Add-PS7ToWindowsTerminal/master/pwsh7.ico' -OutFile $pwsh7IconPath
# Generate PS7 profile JSON
$ps7profile = @{
    'guid' = '{' + (New-Guid).ToString() + '}'
    'name' = 'PowerShell 7-preview (x64)'
    'commandline' = 'C:\Program Files\PowerShell\7-preview\pwsh.exe'
    'icon' = $pwsh7IconPath
} | ConvertTo-Json
# Append comma to profile JSON
$ps7profile = $ps7profile + ','
# Find "profiles" line number
$profilesLine = ($settings | Select-String '"profiles":').LineNumber
# Add new profile to JSON and write to disk
,$settings.Insert($profilesLine+1,$ps7profile)
$settings | Out-File $settingsFilePath

Code here on GitHub.

Tutorial: Use a CSV file to make a graphical menu of PowerShell scripts

I’ve recently been working on a PowerShell module that uses a CSV file to create a custom menu of scripts.

It looks like this:

It hopefully helps to bridge the gap between engineers and automators, who write scripts useful to others, and service desk people and technicians, who may not be confident with the command line. PSScriptMenuGui allows PowerShell coders to put their scripts in a simple menu, usable by anyone.

It’s loosely inspired by (criminally similar to) something I made for a previous employer.

(The main difference is that this version starts instantly. The old version was so slow that I made an entertaining loading screen to fill the void. A good subject for a future blog post…)

If you’d like to dive straight in, please:

The rest of this blog post acts as a tutorial.

If you’d like to be guided through making your own menu, keep reading…

Step 0: System requirements

The module works on Windows only – sorry, rest of world!

Apart from that, it should run pretty much anywhere. It works on:

  • PowerShell for Windows 5.1 which comes with Windows 10.
  • PowerShell 7, currently available as a preview and due to be finished at the start of 2020.

It does not work on PowerShell Core 6. If you have this version, the easiest solution is to use PowerShell 5.1 as it is already on your PC.

Step 1: Install the module and make an example menu

Open a PowerShell prompt and:

# Navigate to where you want to work on your menu - in my case OneDrive:
cd $env:OneDrive
# Install the module:
Install-Module PSScriptMenuGui -Scope CurrentUser
# You may need read and agree to messages about updates and trust
# Make an example menu to get you going:
New-ScriptMenuGuiExample

You should see this:

VERBOSE: Copying example files to PSScriptMenuGui_example...

Step 2: Explore the example

Navigate to your PSScriptMenuGui_example folder and open PSScriptMenuGui.ps1. You should see a bit of boilerplate to ensure that the module is loaded, followed by this line which displays the menu:

Show-ScriptMenuGui -csvPath '.\example_data.csv' -Verbose

Try running the line in your PowerShell window. You should see the example menu from the GIF at the top of this post.

Now open example_data.csv. A text editor is fine but Excel is easier. You can see that every row in the CSV represents an item in the menu.

Step 3: Make it your own

Experiment with editing the CSV and running the Show-ScriptMenuGui command again to see your changes.

A few ideas:

  • Put one of your scripts in the folder and add it to the menu using Method powershell_file and Command .\filename_of_script.ps1.
  • Try including PowerShell commands in the CSV file. Use Method powershell_inline and Command Get-ComputerInfo. Run Show-ScriptMenuGui with -NoExit to stop the PowerShell window from closing.
  • Add a link to an external application. Use Method cmd and enter the path of the program in Command.

Step 4: Next steps

Step 5: Make a shortcut

When you’re happy with your menu, why not make a shortcut to it in File Explorer?

  1. Right click a blank area in a folder window or on your desktop.
  2. Select New → Shortcut
  3. Enter something like this as the location:
C:\Windows\System32\WindowsPowerShell\v1.0\powershell.exe -ExecutionPolicy Bypass -WindowStyle Hidden -File "C:\full\path\PSScriptMenuGui_example\PSScriptMenuGui.ps1"