Add PowerShell-7 preview to Windows Terminal in 30 seconds

Edit: The stuff below doesn’t work any more. But this new stuff works.

Fun times in Windows land over the last few days with the release of new previews of Windows Terminal (v0.4) and PowerShell 7 (Preview 3).

To celebrate, here’s a simple script that you can copy-and-paste into a PowerShell window to add PowerShell 7 to Windows Terminal. (You can even use the Windows Terminal PowerShell terminal. Wow!)

The whole thing might take 30 seconds, which is a significant improvement on my last effort of 2 minutes. Why not take 1 minutes 30 seconds to make yourself a drink?

Pre-requisites:

  • PowerShell 7-preview x64 is installed
  • Windows Terminal v0.4 is installed and has been run

Here’s what it looks like:

Here’s the code:

$terminalFolderPath = "$env:LOCALAPPDATA\Packages\Microsoft.WindowsTerminal_8wekyb3d8bbwe\LocalState"
# Get Windows Terminal settings file
$settingsFilePath = Join-Path $terminalFolderPath 'profiles.json'
$json = Get-Content $settingsFilePath | ConvertFrom-Json
# Get profiles
$profiles = $json.profiles
# Make a copy of first profile and configure for PS7 x64
$ps7 = $profiles[0].psobject.Copy()
$ps7.name = 'PowerShell 7-preview (x64)'
$ps7.commandline = 'C:\Program Files\PowerShell\7-preview\pwsh.exe'
$ps7.guid = '{' + (New-Guid).ToString() + '}'
# Download and set icon
$pwsh7IconPath = Join-Path $terminalFolderPath 'pwsh7.ico'
Invoke-WebRequest -Uri 'https://raw.githubusercontent.com/weebsnore/Add-PS7ToWindowsTerminal/master/pwsh7.ico' -OutFile $pwsh7IconPath
$ps7.icon = $pwsh7IconPath
# Write updated settings file to disk
$json.profiles = $profiles + $ps7
$json | ConvertTo-Json | Out-File $settingsFilePath
And here it is on GitHub.

Get Task Manager list of Apps with PowerShell

Over the past couple of years I’ve been impressed by a series of small improvements to the Task Manager which have made it pretty great to use.

I recently noticed that you if you right click the column titles in the Processes tab and tick all the boxes, you rarely have to venture to the Details tab. (The most valuable column to add, in my opinion, is Command line.)

The Processes tab also attempts to lump items into a few categories: Apps, Background processes, Windows processes.

How does it do this?

Luckily, Raymond Chen briefly explains what’s going on in a blog post from 2017.

To take Apps as an example: If the process has a visible window, then Task Manager calls it an “App”

Can we do something similar with PowerShell?

Probably. Kinda.

Here’s my attempt:

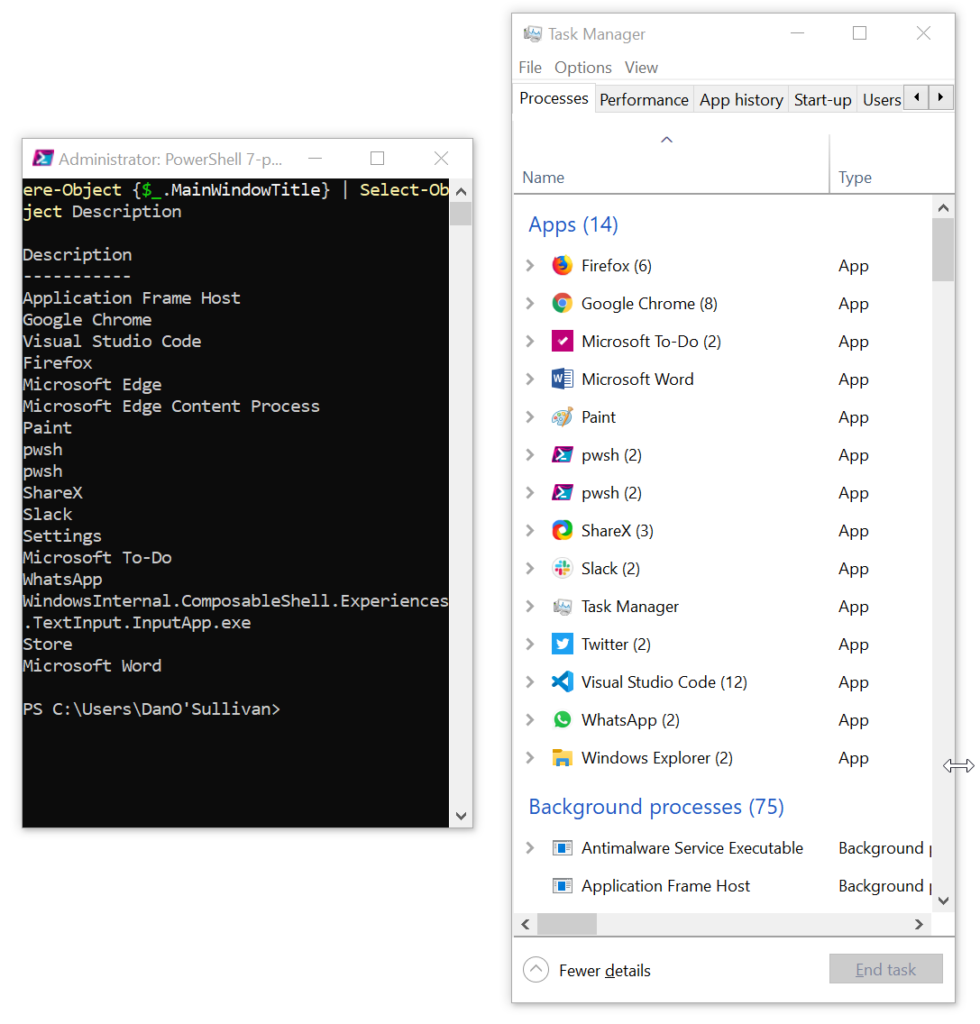
Get-Process | Where-Object {$_.MainWindowTitle} | Select-Object Description

And the result:

You can see that I get processes that have a MainWindowTitle and display the process Description.

The results are similar but not identical: PowerShell shows some bits of Windows internals that are displayed elsewhere in Task Manager.

Can you get any closer?

Explore Azure Function’s PowerShell environment

Want to know more about the environment that your Azure Functions script is running in?

Here’s a little script I put together for this month’s Minneapolis PowerShell User Group:

# d_ExploreAzureEnvironment

# Script to explore the Azure Functions PowerShell environment
# by running commands from a menu and returning their output
# as a string.

using namespace System.Net

param($Request, $TriggerMetadata)

$itemToRun = $Request.Query.Run

$runResult = switch ($itemToRun) {
    0 { Get-ChildItem env: }
    1 { $PSVersionTable }
    2 { Get-Variable }
    3 { Get-Process }
}
if ($runResult) {
    $status = [HttpStatusCode]::OK
    $body   = $runResult | Out-String
}
else {
    $status = [HttpStatusCode]::BadRequest
    $body   = 'Supply a parameter of Run with a value between 0 and 3'
}

Push-OutputBinding -Name Response -Value ([HttpResponseContext]@{
    StatusCode = $status
    Body       = $body
})

(code is also on GitHub)

As you can see, the script contains a menu of commands that you can select by supplying a parameter of Run with a value between 0 and 3.

The selected command is executed, its output is stored in $runResult, and $runResult is converted to a string, then returned in the HTTP response body.

You can control the whole thing in your web browser like so:

I’ve included a few commands to examine system and PowerShell variables and processes. Adding a command is as simple as this:

You can also use this script to compare the local debug environment provided by Azure Functions Core Tools with Microsoft’s hosted version (a bit more on this soon…)

It would be trivial to extend this concept and make a script that executes arbitrary commands. But it feels like a bad idea, so I restrained myself.

What other commands would you like to try out? How’s your exploration of Azure Functions going? The race to be first commenter continues!

PowerShell Azure Functions to PowerApps “Hello World” (Part 3)

In the previous two parts, we published a simple PowerShell Azure Function to the cloud and created a PowerApps Custom Connector for it.

Now – the fruits of our labour – Hello World!

PowerShell Azure Functions to PowerApps “Hello World” (Part 2)

Last time, we deployed a function to Azure.

We now have a PowerShell script sitting in the cloud which we can talk to via a HTTP REST call.

This time, we’ll create a Custom Connector in PowerApps so that we can hook our script into an app.

Part 2: Create a Custom Connector

You should first make sure that you can talk to your function with PowerShell:

  1. Open your Function in the Azure console and click Get function URL.
  2. Leave default (Function key) selected and copy the URL. You should get something like this:
    https://dan-function.azurewebsites.net/api/a_HelloWorld?code=PA1Twlk/anVrchlbKSZSvZcWQCawE5MjY2JcQ3s0/kMYqpnvI2WEMA==
  3. Append &Name=myName to the end and run with Invoke-RestMethod:
Invoke-RestMethod "https://dan-function.azurewebsites.net/api/a_HelloWorld?code=PA1Twlk/anVrchlbKSZSvZcWQCawE5MjY2JcQ3s0/kMYqpnvI2WEMA==&Name=Dan"

Once you’re happy that your function is working, switch over to Power Apps.

Here’s a video demo:

And here are step-by-step instructions:

Start with Custom Connectors → New custom connector → Create from blank

(Create from Azure Service (Preview) doesn’t work with the Azure Functions 2.x runtime – a to-be-expected example of two preview features not working together.)

  1. General screen
    Host is your Azure Functions domain, in my case:
    dan-function.azurewebsites.net
  2. Security
    Authentication type: API key
    Parameter code: code
    Parameter label: code
    Parameter location: Query
  3. Definition
    Action New action
    1. General
      Summary and Operation ID: hello_world
    2. Request
      click Import from sample
      Verb = POST
      URL = an example of a full query, including Name=myName
      Click Import, then delete the block named code, as it is already handled in the Security section.
    3. Response
      Click Add default response, then run a chunk of PowerShell like this to get an example response that you can paste into the Body field:
$response = Invoke-WebRequest "https://dan-function.azurewebsites.net/api/a_HelloWorld?code=PA1Twlk/anVrchlbKSZSvZcWQCawE5MjY2JcQ3s0/kMYqpnvI2WEMA==&Name=Dan"
# Show response in console
$response
# Copy response body to clipboard
$response.Content | clip

Now save your connector and go to the Test tab.

Under Connections, click New connection. Enter your function key when prompted (the long bunch of characters that appear after code= in a request URL).

When your connection has been created, return to the Test screen, and try out your function. You should hopefully see a familiar and reassuring block of JSON – greetings!

That’s it for now. Next time, we complete the package by adding our PowerShell function to a real life actual PowerApp.