But if you make a B1S VM with the Ubuntu Server 18.04 LTS image, you start getting charged a trickle of cash for the disk. I amassed a bill of $1.26 before I noticed – quite shocking!
What’s up?
It turns out the 6 in P6 represents the size of the disk: 64 GB.
And the Ubuntu disk is only 30 GB. So you’re being charged for using too small a disk!
Luckily the fix is simple.
Start by creating your VM as normal:
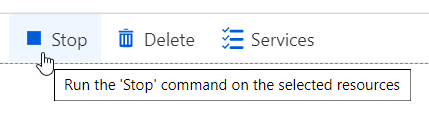
Once it’s been provisioned, Stop (Deallocate) the VM:
Then open your VM in the Azure portal and navigate to Disks -> click disk name -> Configuration.
Set Size (GiB) to 64 and click Save.
Then start your VM back up. It should now be free of charge – and you’ll have a bit more space to play with.
# d_ExploreAzureEnvironment

# Script to explore the Azure Functions PowerShell environment
# by running commands from a menu and returning their output
# as a string.

using namespace System.Net

param($Request, $TriggerMetadata)

$itemToRun = $Request.Query.Run

$runResult = switch ($itemToRun) {
    0 { Get-ChildItem env: }
    1 { $PSVersionTable }
    2 { Get-Variable }
    3 { Get-Process }
}
if ($runResult) {
    $status = [HttpStatusCode]::OK
    $body   = $runResult | Out-String
}
else {
    $status = [HttpStatusCode]::BadRequest
    $body   = 'Supply a parameter of Run with a value between 0 and 3'
}

Push-OutputBinding -Name Response -Value ([HttpResponseContext]@{
    StatusCode = $status
    Body       = $body
})
As you can see, the script contains a menu of commands that you can select by supplying a parameter of Run with a value between 0 and 3.
The selected command is executed, its output is stored in $runResult, and $runResult is converted to a string, then returned in the HTTP response body.
You can control the whole thing in your web browser like so:
I’ve included a few commands to examine system and PowerShell variables and processes. Adding a command is as simple as this:
You can also use this script to compare the local debug environment provided by Azure Functions Core Tools with Microsoft’s hosted version (a bit more on this soon…)
It would be trivial to extend this concept and make a script that executes arbitrary commands. But it feels like a bad idea, so I restrained myself.
What other commands would you like to try out? How’s your exploration of Azure Functions going? The race to be first commenter continues!
We now have a PowerShell script sitting in the cloud which we can talk to via a HTTP REST call.
This time, we’ll create a Custom Connector in PowerApps so that we can hook our script into an app.
Part 2: Create a Custom Connector
You should first make sure that you can talk to your function with PowerShell:
Open your Function in the Azure console and click Get function URL.
Leave default (Function key)selected and copy the URL. You should get something like this: https://dan-function.azurewebsites.net/api/a_HelloWorld?code=PA1Twlk/anVrchlbKSZSvZcWQCawE5MjY2JcQ3s0/kMYqpnvI2WEMA==
Append &Name=myName to the end and run with Invoke-RestMethod:
Once you’re happy that your function is working, switch over to Power Apps.
Here’s a video demo:
And here are step-by-step instructions:
Start with Custom Connectors → New custom connector → Create from blank
(Create from Azure Service (Preview) doesn’t work with the Azure Functions 2.x runtime – a to-be-expected example of two preview features not working together.)
General screen Host is your Azure Functions domain, in my case: dan-function.azurewebsites.net
Request click Import from sample Verb = POST URL = an example of a full query, including Name=myName Click Import, then delete the block named code, as it is already handled in the Security section.
Response Click Add default response, then run a chunk of PowerShell like this to get an example response that you can paste into the Body field:
$response = Invoke-WebRequest "https://dan-function.azurewebsites.net/api/a_HelloWorld?code=PA1Twlk/anVrchlbKSZSvZcWQCawE5MjY2JcQ3s0/kMYqpnvI2WEMA==&Name=Dan"
# Show response in console
$response
# Copy response body to clipboard
$response.Content | clip
Now save your connector and go to the Test tab.
Under Connections, click New connection. Enter your function key when prompted (the long bunch of characters that appear after code= in a request URL).
When your connection has been created, return to the Test screen, and try out your function. You should hopefully see a familiar and reassuring block of JSON – greetings!
That’s it for now. Next time, we complete the package by adding our PowerShell function to a real life actual PowerApp.
I like to make little videos to go with my blog posts, and today I’ve been looking for a way to resize my browser window to a consistent size for recording.
Google immediately turned up this little beauty in the TechNet Script Center:
Cannot convert argument "hWnd", with value: "System.Object[]", for "GetWindowRect" to type "System.IntPtr": "Cannot convert the "System.Object[]" value of type "System.Object[]" to type "System.IntPtr"."
At C:\Git\PowerShell\Set-Window.ps1:91 char:9
+         $Return = [Window]::GetWindowRect($Handle,[ref]$Rectangle)
+         ~~~~~~~~~~~~~~~~~~~~~~~~~~~~~~~~~~~~~~~~~~~~~~~~~~~~~~~~~~
+ CategoryInfo          : NotSpecified: (:) [], MethodException
+ FullyQualifiedErrorId : MethodArgumentConversionInvalidCastArgument
# Only get non-zero handles
$Handle = (Get-Process -Name $ProcessName).MainWindowHandle | Where-Object {$_.ToInt32() -gt 0}
# The Handles have type IntPtr. Without .ToInt32() you get this error:
# Cannot compare "0" because it is not IComparable
But after a bit of poking around, I think this is a little better:
# Only get process whose parent is explorer
$Handle = (Get-Process -Name $ProcessName | Where-Object {$_.Parent.ProcessName -eq 'explorer'}).MainWindowHandle